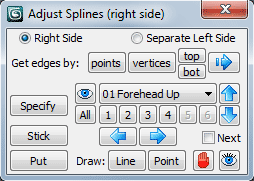
 Some buttons near label Get edges by: are used to align controls by selected edges of the mesh. Select edges at first and then adjust
current spline by selection. Selected edges must form a single line.
Some buttons near label Get edges by: are used to align controls by selected edges of the mesh. Select edges at first and then adjust
current spline by selection. Selected edges must form a single line.
Some buttons near label Get edges by: are used to align controls by selected edges of the mesh. Select edges at first and then adjust
current spline by selection. Selected edges must form a single line.
| points | Selects edges by picking two points: start point and end point. Press the button and click on a mesh (with 3D snap turned on by Endpoint) at two different vertices. If these vertices belong to a single edgeloop then edges between them will be selected |
| vertices | Selects edges between two selected vertices of the mesh: start and end. Select two vertices and press this button. If these vertices belong to a single edgeloop then edges between them will be selected |
| top bot |
These buttons work if closed edgeloop is selected, for example circular edgeloops in eyelid or mouth areas. Press top button to select only upper half of the edgeloop, press bot button to select lower half. This may be useful while adjustment of splines at top/bottom eyelid or top/bottom lip |
 |
Align current spline by selected edges Button aligns controls of current spline by selected edges immediately. Read below how to know which spline is current, but if Next checkbox is checked then script itself will change current spline, so when you aligned some spline it switches to next spline automatically |
 |
Hide Current Spline Hide/Show current splne and its controls |
 |
Hide all splines and controls Hide/Show all splines and controls at current side of the head |
 |
Undo Last Operation Turn back to previous position of adjusted control(s) |