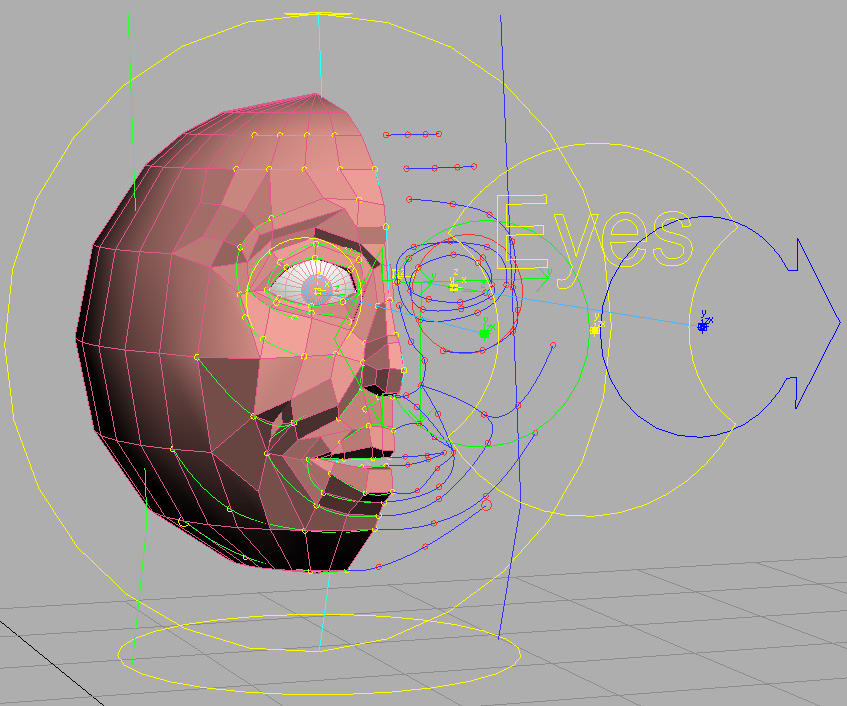
Spline system represents a symmetric or an asymmetric set of splines are driven by controls - yellow circles.
Side with yellow circles is the main, side with red circles is frozen, unavailable to select and driven by the main side. So, when you
move yellow circle, appropriate red circle will be moved symmetrically. By default right (green) side with yellow controls drives the
left (blue) side with red controls. Central splines are lightblue. If you see only one side of spline model then turn off
"Hide frozen objects" checkbox in 3ds max command panel at Display tab. Select yellow circles either one by one or many controls at once and
move them to required positions, btw if you click on spline then controls of this spline will be selected automatically.
Also to speed up adjustment and make it more easy you can use Adjust Splines tool,
is called from the main window.
Recommendations of spline adjustment
- Biggest yellow circle is a parent of whole spline system, at first you have to move and scale it to match splines and the face as near
as you can, but avoid situation when spline controls is placed inside the head - in this case it will be very hard to select controls.
Try to match nose and mouth at most
- Horizontal yellow circles at the neck bottom and head top is used to set the start of neck bone and the end of head bone,
if your character already have such bones then you may skip accurate alignment of these circles
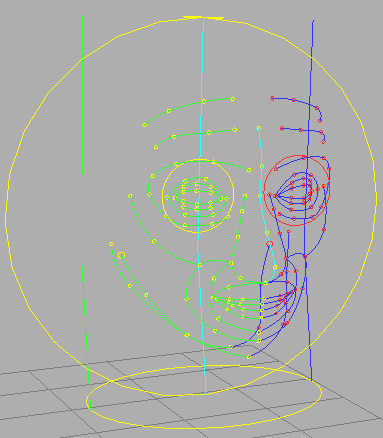
- Circles around the eyes drive with eyelid splines, you have to scale and move them to approximately match the eyelids, another good point
is to move these circles temporarily aside to release a place, adjust forehead and brow splines and then move eyelid circles back for
final adjustment
- Best order to adjust splines is: forehead, brows, upper cheeck (this is the curve continuing a brow spline under eye), nose,
jaw, neck, chin, mouth, cheeks, eyelids
- Curvature of splines doesn't play a special role, since bones are the straight lines from control to control, that's why correct
positions of yellow controls are very important (ideal placement is on mesh vertices)
- Lip bones will not go on lip splines, but on middle (central) curve between splines, inner and outer splines of the lip
define size of envelopes in Skin modifier since top spline specifies outer boundary of top lip, inner top spline specifies inner boundary
(same rule for the bottom lip)
- Outer splines of the eyelids define boundaries of lids (top and bottom), bones will not go on them, these splines set size of envelopes
and defines where influence of brow bones will be ended, that's needed for brow controls do not affect eyelids while moving
- Inner eyelid splines set eye boundary exactly around the visible part of eyeball,
usually these splines are placed on inner edgeloop of the eyelid mesh
- Middle eyelid splines set the middle of eyelids, usually these splines are placed approximately at center between inner and outer splines.
Place these splines very accurate, because of situation when lid goes into eye while closing - this depends on position
of middle eyelid splines
- Eyelid splines adjustment priority: outer, inner, middle. It is better to put any control of eyelid splines on approximately
same distance from next control, because of same length of bones in future - this will provide correct deformation of the mesh
Accurate mesh topology is very important to perform fast spline adjustment. Btw, nice looking and correct animation requires a very good
topology: edgeloops around eyes and mouth, uniform mesh, quad polygons, welded vertices.
There are two issues besides correct topology. These issues are related with eyelid and mouth splines (most problematic face parts to adjust):
if the model have half-opened mouth (not closed) then it will be incomparable more simply to set inner lip splines during adjustment of
mouth splines, also if eys are half-opened (not closed or widely opened) then you hit two targets at one shoot: simplify adjustment of
eyelid splines and add required geometry on lids, because if the eyes were created being widely opened then there is no geometry in top eyelid
and if you close it - minimum of polygons goes down, drops into the eye and makes incorrect deformation of the mesh.
Two row of bones (bottom and middle) ensure the rig of each eyelid, so it is very useful to have geometry for each row.
Best solution, especially when you create model to make a rig in BonyFace, when the quantity of vertices on edgeloops around eyes/mouth and
quantity of eye and lip spline controls is the same.
Download sample models, load splines from .bfs files and check how the mesh is looked and how controls was placed.
My "lowpoly spheregirl" have no problem with mesh deformation during animation, because topology corresponds to controls and all controls
in critical places (where deformation must be very accurate) was put strongly into mesh vertices. It is simpler to understand it if to imagine
that future bone should go most close and in parallel to its polygon, then polygon will be deformed correctly while animating.