This window is the origin of BonyFace workflow to start from scratch and create facial autorig and autoskin for your 3D head/character. User works with this window from top to bottom, all tools were placed in appropriate groups and described in the same order as work with them: pick objects, create splines, autorig, adjust controls and, finally, autoskin.

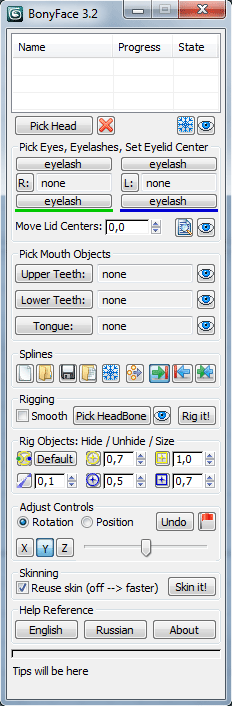
A list in the top of the window shows all characters (heads) in scene where BonyFace was applied to, if there are no characters then this list is empty.

    List columns:
  1. Name - name of the object was picked by Pick Head button as a head, this name is added to all BonyFace objects as a prefix
  2. Progress - BonyFace progress for the head. The four phases of BonyFace solution are shown in the Progress column and are as folows: picked - if the model was picked, splines - splines were created, rigged - rig was created, skinned - skin was created (final phase)
  3. State - shows the state of model using keywords: F - Frozen, H - Hidden. State can be changed by Freeze button and Hide button are located below this column, so you may hide and/or freeze highlighted heads
Active model is highlighted in yellow. Double-click on an item to make model active. Only one model can be active at a time. All other sets of UI tools work only with active model.

Pick Head of Character Button to pick an Editable Poly object - model of head or character, picking an object opens BonyFace Head Test window
Remove BonyFace stuff Button to remove all BonyFace objects from active character
Freeze Current Head (Highlighted Heads) / Hide Current Head (Highlighted Heads) Buttons to freeze/unfreeze and hide/unhide active model or models, highlighted in the list

Next set of UI tools - two groups to pick separate objects (face parts). You don't need to pick all of them to create rig. The only objects required for the rig to work are the eyes and tongue, other objects (such as teeth and eyelashes) are optional, but if the model has all the parts, they must be picked before rigging.

Pick Eyes, Eyelashes, Set Eyelid Center group
Press R: button to pick right eye, L: button to pick left eye, to pick eyelashes you have to press eyelash buttons, each one picks appropriate eyelash regarding the eye. Eyelash is the Editable Poly object bending with eyelid. Eyelashes instead of eyes are optional objects. After you pick the eye object script renames it and prints new name to nearest textfield. BonyFace defines the side relative to character. When character in the Front view looks at you then his right eye will be at your left, left eye will be at your right, that's why R: at the left side and L: at the right side in the UI.
Hide Eyes Button to hide/show eye objects of active character
See-through Eyes Turns on/off see-through mode for the eyes
After you pick the eyes, BonyFace automatically creates eye-controls and yellow dummies appear at the backside of eyes. Those dummies set the center of rotation (this it not the eye center in 99% cases). Eyelids will be rotated around this center, surrounding the eye. You may hide head, turn on See-through Eyes button and use Move Lid Centers spinner to change positions of centers, for example if your character is a frog, then you need to move centers near to eye center, otherwise eyelids may go in the eye when closing. It's important to note that this value is optional, some characters can be left with this value at its default position, it will not change the way eyelids rotate. Btw, you can move centers before rig creation, after rig creation and even after skin creation, just keep in mind if you move centers after skin then it will be moved with geometry, after rig - with bones. Of course optimum option is to set centers into right positions before creation of the rig, but sometimes it is hard to know the right positions before rig and usually it is defined by practical consideration after several attempts of re-rigging and re-skinning.

Pick Mouth Objects group
Press appropriate buttons to pick mouth parts: Upper Teeth:, Lower Teeth: and Tongue:. The only object in this group required for the rig to work is the tongue, teeth are optional. If your character hasn't tongue or tongue will not be animated, then you can pick any useless Editable Poly object as tongue. Like it is happened for the eyes, mouth objects will be renamed while picking and new names will be printed into appropriate textfields. Use Hide buttons to hide/show mouth objects.

Splines group to operate with spline-model
Buttons are described in the same order as well as are located - from left to right.
Create Splines - create splines using as base the file default.bfs (you can find this file in the BonyFace folder) and scale splines to match the head
Pick Splines from File - create splines based on .bfs file picked by user. Splines are created on coordinates from the file without scaling
Save Splines - Save splines to .bfs file
Load Splines - Load data from .bfs file and apply it to existing splines
Freeze Splines Freeze/Unfreeze splines
Adjust Splines Show/Hide additional window with tools of alignment of splines

Right Side controls Left Side / Left Side controls Right Side / Separate Sides Buttons to operate with symmetry of the spline-model. Right and left side may drive each other or be separate. If the first button is active then right side drives left side, if second is active then left side drives right side, if third button is active - sides are absolutely independent. You can switch buttons at any time. If your model is asymmetrical then adjust one side first and only after that turn on Separate Sides to adjust another side because controls will be near correct positions in that case it will be more easy to adjust.
Driven side has red frozen controls, you don't need select or move them.
NOTE: Checkbox "Hide Frozen Objects" at the 3ds max Display panel has to be turned off, otherwise you will see only one half of spline-model.


Rigging group to create autorig
If the splines are adjusted then you can create rig. Btw you may start rig creation on partly adjusted splines for testing purpose, for example you adjusted splines for eyelids and want to know how the bones would be placed - press Rig It! button with no doubt and look what you've got. It is possible to re-rig at any time if you have initial model and .bfs file for it.
If your model is lowpoly, then you can turn on Smooth checkbox before starting rig creation process to get better oriented controls. Actually it is better to turn it on always except the case when your model is very highpoly, if so then turn it off to greatly decrease the time taken by autorig process.
Pick HeadBone button lets you pick up the head bone if it already exists. For example your have a model with skeleton (CAT, Biped, Bones - it doesn't matter) and/or this model is already skinned by standard Skin modifier of 3ds max. If you don't pick up the head bone then BonyFace creates it's own and also creates the neck bone. That's why you have to pick up the head bone (if it exist already) to avoid duplicates. Hide button hides/shows the head bone was picked up.
Rig It! button starts rig creation process. It is fully automatic, you just have to wait until progress for the head in the list will be changed to rigged.


Rig Objects: Hide / Unhide / Size group to set size and hide/show objects of the rig
Change the values of the spinners to set size of controls, points and bones. Default button resets values to default, all other buttons can be used to hide/show appropriate objects.


Adjust Controls group to set up resulting positions of controls before skin phase
You would get a situations after autorig phase when some controls need specific adjustment, for example script defined normals incorrectly and control is oriented unparallel to head surface. To fix that, you may rotate big points BFMG2p (see Definitions topic) to set correct orientation of such controls. Points are rotated by slider if Rotation mode is on, rotation axis is set by XYZ buttons. Press Undo button to cancel last rotation and turn back to previous orientation of control(s). You have to select needed controls (not points) at one side before rotation, points on another side will be rotated symmetrically. If you want rotate selected controls only and skip symmetrical controls then hold Ctrl before moving slider.
If you want move big point BFMG2p (for example you was lazy at plines phase, control was not adjusted accurately and joint was not placed in correct position) then this is manual operation only - select big point and move it to required position by standard 3ds max Move. Position mode does absolutely different thing, it moves control regarding point to any position you want, for example if controls was dropped into model then you can bring them up very easy, the principle is the same like in Rotation mode.
Reset Points Returns small points back to the centers of the big ones (reset controls). Usually you wouldn't use this button in the adjustment process was described above, but if you will move blue or yellow circles somehow in right or wrong places (i know you will do it differently you wouldn't read this manual) then you can return all controls to original places by a single click. Just a tip - reset points is very useful button during Setup Rig process.


Skinning group to create autoskin
BonyFace applies new Skin modifier or modifies existing Skin modifier, adds bones into it, adjusts envelopes of bones and weights of vertices. Autoskin creation is fully automatical process, press Skin it! button to start it.
If your character already have Skin modifier before starting autoskin then turn on Reuse skin (off --> faster) checkbox to save all settings from old Skin (these settings will be lost instead). If there is no Skin modifier at all then don't worry and turn it off to increase speed of autoskin creation.


Help Reference group
This group contains buttons to open help documents in your browser, help reference is available at two languages: english and russian. Also there is an About button with included information about authors of Bonyface.

A progressbar is located below, it will be changed at autorig and autoskin phases. Also you may see a string of tooltips near progressbar. To view all tooltips you have to perform a couple of clicks on any emty area of the window.