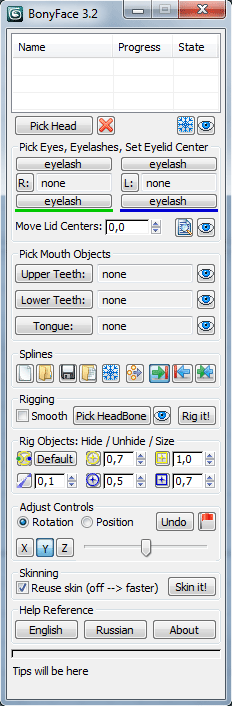
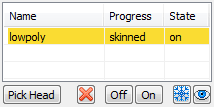
First set of UI tools is a list of models and a row of buttons. Buttons work with list items - models of heads or characters. You can add a new model by pressing Pick Head button. If you have some models already solved by BonyFace present in the scene, then script will add those model in the list automatically when the BonyFace script is run at the start. Active model is highlighted in yellow. Double-click on an item to make model active. Only one model can be active at a time. All other sets of UI tools work only with active model.

List columns
Name of the model is found on the Name column; this name is added to all BonyFace objects as a prefix. The four phases of BonyFace solution are shown in the Progress column and are as folows: picked - if the model was picked, splines - splines were created, rigged - rig was created, skinned - skin was created (final phase). Column State shows the state of model using keywords: on/off - on/off, F - Frozen, H - Hidden.
Pick Head of Character Button to pick Editable Poly object - model of head or character.
Remove BonyFace stuff Button removes all BonyFace objects from active character.
Delete Controllers from Highlighted Heads / Restore Controllers to Highlighted Heads Buttons to delete/restore animation controllers from models, highlighted in the list. This is needed because when more than one character presents in the scene (actually 3-4 characters), animation may be very slow. We found that the performance of a certain character is increased if we delete controllers from the other characters.
NOTE: Be very careful when using these buttons, save the scene and set model to Reset Pose before you delete controllers, because there is a huge risk to lose all BonyFace-animation of the character. So, use buttons at your own risk.
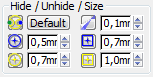
Freeze Current Head (Highlighted Heads) / Hide Current Head (Highlighted Heads) Buttons to freeze/unfreeze and hide/unhide active model or models, highlighted in the list.


Second set of UI tools - buttons to pick separate objects (face parts). You don't need to pick all of them to create rig. The only objects required for the rig to work are the eyes and tongue, other objects (such as teeth and eyelashes) are optional. If the model has all the parts, they must be picked before rigging. If your character hasn't tongue or tongue will not be animated, then you can pick any useless Editable Poly object as tongue. If an object is picked then the text of button changes from "Pick" to "present".
Group Pick Eyes, Eyelashes, Set Eyelid Center
Use Right button to pick right eye, Left button to pick left. BonyFace defines the side relative to character. When character in the Front view looks at you then his right eye will be at your left, left eye will be at your right. Use eyelash buttons to pick eyelashes. Eyelash is the Editable Poly object bending with eyelid.

After you pick the eyes, BonyFace automatically creates eye-controls and yellow dummies appear at the backside of eyes. Those dummies set the center of rotation (this it not the eye center in 99% cases). Eyelids will be rotated around this center, surrounding the eye. You can use Center spinner to change positions of centers, for example if your character is a frog, then you need to move centers near to eye center, otherwise eyelids may go in the eye when closing. It's important to note that this value is optional, some characters can be left with this value at its default position, it will not change the way eyelids rotate.
Hide Eyes Button to hide/show eye objects of active character.

Third set of UI tools - group Splines to work with BonyFace spline-model used by script to create rig. Spline models are kept in *.bfs files.
The spline model is a system of controls to drive splines, which are typical curves of the face. When you select the spline - controls of this spline are selected automatically. Big circles are the main face control and eye controls, you can scale them. Move controls and adjust splines to fill the model.
Buttons to work with *.bfs files
Create Splines - Creates splines using as base the file default.bfs (you can find this file in the BonyFace folder)
Pick Splines from File - Creates splines based on an existing *.bfs file
Save Splines - Save splines to *.bfs file
Load Splines - Load data from *.bfs file and apply it to existing splines
Freeze Splines Button to freeze/unfreeze splines
Adjust Splines Button to show/hide additional dialog with tools of alignment of splines.
Right Side controls Left Side / Left Side controls Right Side / Separate Sides Buttons to operate with symmetry of the spline-model. Right anf left side may drive each other or be separate. If the first button is active then right side drives left side, if second is active then left side drives right side, if third button is active - sides are absolutely independent. You can switch buttons at any time. Driven side has red frozen controls, you don't need to select or move them.

NOTE: In this case, checkbox "Hide Frozen Objects" at the Display panel has to be turned off; otherwise you will see one half of spline-model.


Fourth set of UI tools - group Rigging: Bones and Skin contains buttons to start rig and skin creation and a few optional tools.
Rigging and skinning are fully automatic processes. If your character already has a skeleton with applied Skin modifier then BonyFace will include rig to skeleton and edit Skin.
Add Meshsmooth If your model is lowpoly, then you can turn on this checkbox before starting rig creation process to get better oriented controls.
Pick HeadBone Button to pick the main bone in a head of existed skeleton (if you want to include BonyFace-rig to an existing rig - press this button and pick the headbone of your rig (be it a CAT, Character Studio or Normal Bones rig) before starting rig creation.
Create Rig Button to start rig creation process; you have to wait for the process to end. This usually doesn't take more than 1 minute, depending on your machine
Add Skin Button to start skinning process; you have to wait for the process to end. This usually doesn't take more than 1 minute, depending on your machine
Setup Rig Button to call Setup Rig window


Fifth set of UI tools - group Hide / Unhide / Size contains buttons to hide/show rig objects and spinners to change size of these objects.
Hide bones and points to increase performance in the viewports. Use spinners to set required size of points, bones or controls.
Set Default Values Button to set sizes to default values
Eyes Splines Button to hide/show splines of eye controls
Directs Button to hide/show directs
Softs Button to hide/show softs
Bones Button to hide/show bones
Direct Points Button to hide/show direct points
Soft Points Button to hide/show soft points


Sixth set of UI tools - group Tools contains buttons to call additional windows to work with rig and animation.
Poses - save, load and browse facial poses
Drive - create, remove and operate with animation layers, take mocap-animation and add it to controls
Face - select/move major controls via UI interactive and fast
Selector - select/move all controls via UI, copy/paste positions of symmetric controls


Seventh set - help information.
Online Help Button to open this document
BF on the Web Button to open official internet-site of BonyFace
About Button to open window with infromation about authors of BonyFace
Tip Tips (click in this area to view another tip)